Making home-made yogurt tubes is not the quickest process, however I can think of numerous occasions where I would have LOVED to have a keto meal ready-made, in a tube, frozen and ready to eat. I can’t think of a better meal to send with a keto kid to school, camp, grandparents houses, birthday parties, picnics, the beach, you name it. After these are made, you can throw them in a cooler with ice packs and hit the road (just remember a small pair of scissors to open it!)
Here is the process broken down step by step. It took a little trial and error to get the right size tube for my particular recipe, and there is definitely a little more waste of the food saver bags than I care for… but to have this in the freezer and be able to travel with it is worth it in my opinion.
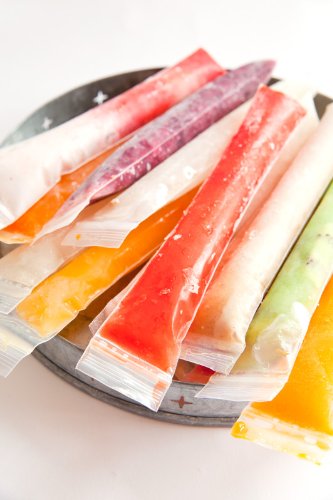
***UPDATE*** A new, MUCH EASIER way of making these pops is now available! Please click here to order Zipzicle bags (pictured below). OR you can continue with the original method 😉
Step 1
Make the yogurt. The recipe I am using is my fruit yogurt. This is a peach version. Please not that this has changed slightly since our move since my brand of cream is different. I was using Organic Valley Cream, but now I’m using Trader Joe’s which is 40%. The entire serving of the recipe is 118 grams, the how much needs to fit inside the yogurt tube, WITH room to spare for it to seal properly.
3.5:1 Ratio
about 290 calories
21g peaches
15g 40% heavy cream
62g Stonyfield Yogurt, Plain Whole Milk
10g walnut oil
10g coconut oil
Again, total weight is 118g per serving. This is how much you need to fit into the tube.
I use a blender to make a large batch of yogurt. You will lose a few grams of it in the process, if this concerns you, you will have to puree the peaches separately then mix each serving separately as well.
I make 6 serving at a time. Multiply each ingredient by 6 and blend it all together in the blender until it is completely smooth. It helps to have the coconut oil melted when you first mix the batch of yogurt. This will help it incorporate completely.
Step 2
Make the yogurt tubes. Make a tube bigger than you think the first time, so you get an idea of how much space your recipe needs.
To held enough for this recipe, you will need a roll of 11 inch FoodSaver plastic. For each tube, you need about 4.5 inches. Once you have cut the first length, seal the first side. When the Foodsaver starts to “suck” to remove any moisture or air, hit the stop button to by-pass this and go straight to the heat sealing step. You should have this…

Next seal the other side. Again, hit the stop button to stop the air removal. Now you have an empty tube that is sealed on all 4 sides. The middle portion is where the yogurt will go and it as about 2 inches across.

Trim one of the short ends (factory sealed edges) to make the top opening.

Put the empty tube in a tall cup on your scale and ZERO the scale. Use a funnel or just hold the tube open with one hand and carefully pour in the yogurt mixture (whoops, first tube I made was too small! Do you see it only weighs 86g?) If you over fill, use a syringe to remove any extra.

This is why you need at least 2 inches extra room at the top. Now you have to seal the top opening. I had no problem sliding in the extra and getting it to seal. Make sure you hit the stop button to prevent it from sucking out the yogurt!!!! Now you should have this…

Trim the extra off the sides and put it in the freezer.

You could put anything in here, it doesn’t have to be yogurt…, pudding, applesauce, ice creams, really anything that is pureed. After eating the frozen pop, if there is anything remaining in the plastic I would recommend adding a small amount of water and swishing it around. You would have to then drink the water… or cut it open and let the kids lick it out ( I know my kids would not have a problem with that!)
Also… did you know, you can re-seal store-bought yogurt tubes! The only downside it that they are much smaller and only hold 56g. After cutting off the top and taking into consideration the room needed to re-seal, your recipe could only be about 30g total weight. If you have a fruit puree or need small 50 or 100 calorie snacks, these might work for you!


Dawn, what a great idea. Whenever I saw go-gurts in stores, I wanted to find out if I could buy storage bags that are similar in size… but of course I was too lazy to research for it. =) I will have to try this for Clara! She will love it… IT will be great for Clara’s sister too since I stopped buying those yokids once I realized how much sugar is in them. Thanks!
One quick question. Did you have any problems with it leaking as it melts in the bag?
Tiffany, you crack me up! I know you know me e-mail:) regardless, I have not had any trouble with leaking, it is pretty easy to tell if the yogurt tube has been sealed correctly. With the Foodsaver bags, you can see the seal all the way around. Just make sure that it is not overfilled, you need at least 2 inches of head room to properly seal the bag without yogurt leaking out!
PS… I will be the first to admit that keto yogurt tubes take a little more effort than most recipes.. Once the tubes are made, the reast is easy though!